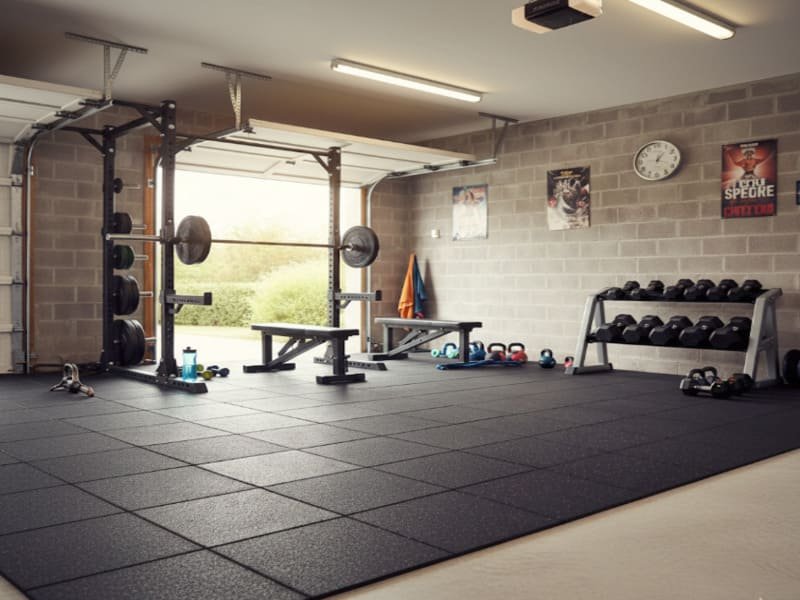
Yes, the right garage gym mats are the single most important investment for protecting your concrete floor, expensive equipment, and personal safety. They absorb impact, reduce noise, and provide a stable, non-slip surface essential for effective training.
Your concrete garage floor is a liability. As a quality control engineer, I see its material properties as fundamentally opposed to the demands of a gym. Concrete has high compressive strength but is brittle and has poor impact resistance. Dropping a 45-pound plate can create a shockwave that exceeds its tensile limit, causing cracks and spalling. This not only damages the floor but can rebound energy back into your barbell, damaging bearings. It is also a dusty, hard surface that provides zero ergonomic benefit, leading to joint stress over time. You need a material engineered specifically for impact dissipation and durability. Garage gym mats create a necessary buffer zone, absorbing the force from dropped weights and protecting both your floor and your equipment from costly damage. A proper mat is not just a floor covering; it is a critical piece of safety and performance equipment.

This guide will give you the technical knowledge to select the perfect mat.
What Are Your Garage Gym Mat Options?
Your primary options are interlocking rubber tiles, budget-friendly horse stall mats, or lightweight EVA foam. For serious lifting, high-density rubber is the only material that meets quality and safety standards. Foam is only suitable for bodyweight exercises.
| Feature | Interlocking Rubber Tiles | Horse Stall Mats | EVA Foam Tiles |
|---|---|---|---|
| Primary Use | Full Garage Coverage | Deadlift/Lifting Zones | Bodyweight, Yoga |
| Durability | High | Very High | Low |
| Protection | Excellent | Maximum | Minimal |
| Installation | DIY-Friendly | Difficult (Heavy) | Very Easy |
| Cost ($/sq. ft.) | $3.00 – $12.00+ | $2.00 – $3.50 | $1.00 – $2.50 |
From a manufacturing standpoint, the differences are significant.
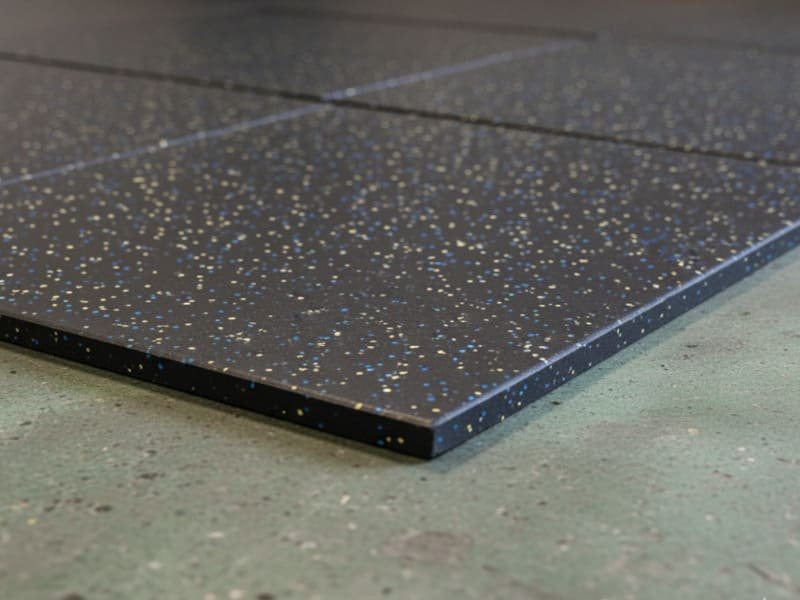
Interlocking Rubber Tiles
These are manufactured with precise tolerances to ensure the interlocking mechanism is secure. Higher quality tiles use a high percentage of SBR rubber with polyurethane binders, which results in a low-odor, non-porous surface that is easy to clean. Quality control checks ensure consistent thickness and density across every tile for a uniform surface.
Rubber Stall Mats
Stall mats are a budget champion because their manufacturing process is less refined. They are typically made from vulcanized recycled rubber, a process that uses sulfur and high heat to bond the material. This process is effective for creating durability but often leaves a residual sulfur smell that can take weeks or months to dissipate. Surface textures can also be inconsistent.
EVA Foam Tiles
EVA foam is an open-cell copolymer. It feels soft because impact compresses the air out of the cells. This material has poor "memory," meaning under the sustained pressure of a squat rack or the sharp impact of a dumbbell, the cells crush permanently, offering no long-term protection.

Understanding these materials is the first step to making the right choice.
How Thick Should Your Garage Gym Mats Be?
For serious weightlifting involving dropped weights, 3/4 inch (19mm) is the industry-standard minimum thickness. For general fitness with light weights, 8mm (5/16 inch) is sufficient. The thickness directly relates to the mat’s ability to dissipate impact energy.
The core engineering principle here is force dissipation. When you drop a heavy barbell, the mat’s job is to absorb and spread that kinetic energy over a larger surface area, reducing the peak force (measured in PSI) exerted on any single point of the concrete below. A thicker mat provides more volume for this energy to travel through and dissipate. From a quality control perspective, we don’t just measure thickness; we test for material density and Shore A durometer (hardness). A mat that is too soft will not provide a stable footing for lifts, while a mat that is too hard will transfer too much impact to the subfloor, defeating its purpose.
For General Fitness & Light Weights (<100 lbs)
An 8mm to 1/2-inch mat provides enough material to absorb the impact from kettlebells and light dumbbells. The force is low enough that it can be dissipated effectively without risk to a standard concrete slab.
For Serious Weightlifting & CrossFit
A 3/4-inch mat is the gold standard. Its thickness and density are engineered to handle the repeated impact of fully loaded barbells dropped from waist height or higher. This is the minimum thickness required to reliably prevent concrete cracking over the long term.
For Extreme Powerlifting
For lifters moving loads over 500 lbs, a single 3/4-inch mat may not be enough. This is why dedicated lifting platforms are built by layering two sheets of plywood with a 3/4-inch rubber mat on top. This layered system creates the ultimate impact-absorbing structure.

Choosing the right thickness is a technical decision, not an aesthetic one.
What is the Real Cost of Garage Gym Mats?
The material cost for garage gym mats ranges from $1.00 per square foot for foam to over $12.00 for premium rubber. Horse stall mats offer the best value for protection at around $2.00-$3.50 per square foot, but may have hidden costs.
The price of a mat is a direct reflection of its raw materials and manufacturing process. The cheapest option, EVA foam, is inexpensive to produce. The most expensive option, premium virgin rubber tiles, involves higher raw material costs and more precise, energy-intensive manufacturing to ensure dimensional accuracy and a clean finish. As a QC engineer, I can tell you that a significant portion of the cost for premium tiles is tied to quality assurance—weeding out defects, ensuring consistent color and texture, and post-production treatments to eliminate odors. You are paying for a product that has passed rigorous inspection. When budgeting, you must look beyond the price per square foot. Consider the total cost of ownership, including logistics and tools.
Hidden Costs to Consider
- Delivery: Rubber is dense and heavy. A single 4’x6’x3/4" stall mat can weigh 100 lbs. Unless you have a truck, delivery or rental fees can add a significant amount to your total cost.
- Tools: To get a clean, professional finish, you will need a high-quality utility knife with plenty of sharp replacement blades, a solid straightedge or framing square, and a measuring tape.
- Time & Labor: Cutting and fitting heavy rubber mats is a physically demanding job. Be realistic about the time and effort required for a DIY installation.

A complete budget accounts for materials, delivery, and installation needs.
What Do You Need to Know for Installation & Maintenance?
A successful installation requires a clean, dry subfloor and a sharp utility knife for cutting. Long-term maintenance is simple: regular vacuuming and occasional mopping with a pH-neutral cleaner will preserve the rubber’s integrity for years.
The performance of your flooring is directly linked to the quality of its installation. Rubber is a flexible material, meaning it will conform to any imperfections in the subfloor. Any debris left underneath will create high spots that wear unevenly over time. From a quality perspective, the most common installation error we see is improper cutting. Using a dull blade will tear the rubber instead of slicing it, leading to a jagged, unprofessional finish and gaps between mats. Proper preparation and the right tools are non-negotiable for a lasting result. For maintenance, it’s critical to use the right cleaning agents. Harsh, solvent-based cleaners can break down the polyurethane binders in the rubber, causing it to become brittle and crack. This is a form of chemical degradation that we specifically test against. A simple solution of mild soap and water is all that’s required to keep your mats in top condition.
The DIY Installation Guide
- Prepare Your Floor: Sweep and vacuum the entire area. The concrete must be completely clean and dry.
- Acclimate the Mats: Let the rubber mats sit in the space for at least 24 hours. This allows them to adjust to the ambient temperature and humidity, preventing future expansion or contraction.
- Cutting to Fit: Use a very sharp utility knife. Score the mat several times against a straightedge, then bend the mat along the score line to complete the cut. A drop of soapy water on the blade can reduce friction for a smoother cut.
- Managing Odor: For new stall mats, wash them with a mild detergent and let them air out, preferably outside in the sun, for a few days before bringing them inside.
Proper care ensures your investment lasts as long as your commitment to training.
Conclusion
Choose your mat based on your training style. 3/4-inch rubber is the standard for heavy lifting. It is the best way to protect your floor, equipment, and yourself.
Ready to build a better, safer gym? Contact our flooring experts today for a free quote or to request product samples. We’ll help you find the perfect foundation for your fitness goals.