
Yes, rubber garage flooring rolls are an excellent choice for a seamless, durable, and professional-looking floor. They offer superior protection and are easy to clean. Their main challenges are the heavy weight and the precision required for installation, making them a two-person job.
Your concrete floor is the weak point of your garage. I’ve spent years on the production line, and I know that concrete is porous, prone to cracking, and stains easily. It kicks up dust and is unforgiving on your back and any tools you drop. You need a wall-to-wall solution that can handle car traffic, dropped wrenches, and chemical spills. Rubber garage flooring rolls provide that single, uniform surface that transforms a garage into a clean, functional workspace. They eliminate seams where dirt and water can collect, creating a true barrier over your concrete. The biggest hurdles are the logistics. These rolls are incredibly heavy, and cutting them perfectly requires patience and a steady hand. My experience has shown me that proper preparation and having a helper are not optional—they are essential for success.

Let’s get into the details to see if this is the right project for you.
Are Rolls a Better Choice Than Interlocking Tiles?
Rubber rolls are better for a seamless, waterproof finish in large, rectangular areas and are often more cost-effective. Tiles are superior for DIY installation in complex-shaped garages because they are easier to handle and cut, and individual pieces can be replaced if damaged.
When we manufacture flooring, we create two main formats for two different needs. The choice between a giant, heavy roll and a box of manageable tiles comes down to balancing aesthetics, installation difficulty, and your specific garage layout. I’ve seen customers choose rolls for that perfect, commercial-grade look, while others prefer tiles for the sheer simplicity of the installation.
The Case for Rubber Rolls
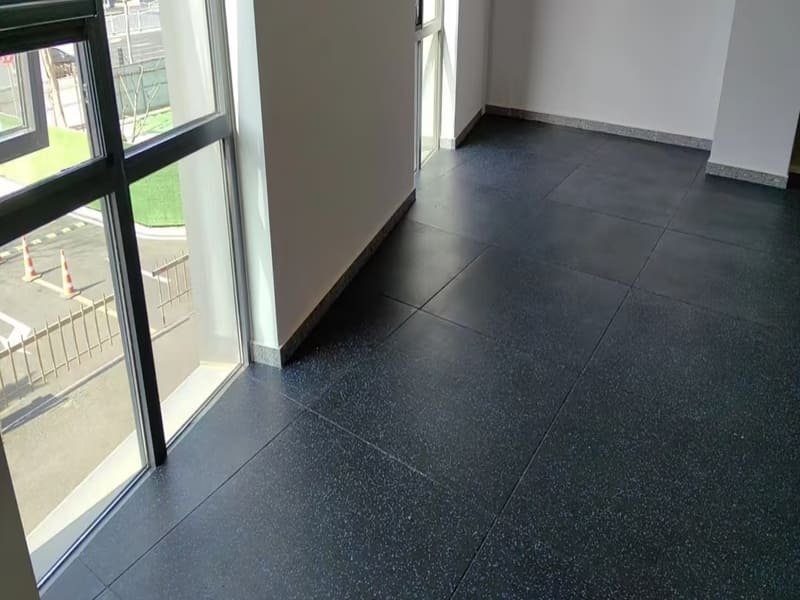
From a production standpoint, a roll is one continuous, vulcanized sheet. This means it has no built-in weak points. For a garage, this is a huge advantage. There are no seams for motor oil, snowmelt, or dirt to seep through to the concrete below. The sheer weight of the roll, often hundreds of pounds, means it stays put with minimal adhesive, creating an incredibly stable and durable surface. For a standard two-car garage, two or three rolls create a floor that looks and performs like a single piece.
The Case for Interlocking Tiles
Tiles, on the other hand, are designed for flexibility. If your garage has support posts, water heaters, or built-in cabinets, cutting tiles to fit is far less stressful than trimming a massive roll. A mistake with one tile is a small problem; a mistake with a roll can be a disaster. The seams are the main trade-off. While they are tight, they can trap fine dust and are not 100% waterproof.
| Feature | Rubber Rolls | Interlocking Tiles |
|---|---|---|
| Appearance | Seamless, Uniform | Grid Pattern, Visible Seams |
| Installation Difficulty | Very High (Heavy, Awkward) | Low (DIY-Friendly) |
| Water Resistance | Excellent (No seams) | Good (Seams can leak) |
| Repair | Difficult to patch | Easy (Replace one tile) |
| Best For | Large, open rectangles | Odd-shaped or small areas |
| Cost (Large Area) | Generally Lower | Generally Higher |

Choosing the right format is the most important first step for your project.
Can Rubber Rolls Withstand a Harsh Garage Environment?
Absolutely. High-density rubber rolls of 8mm thickness or more are specifically engineered to handle the demands of a garage. They easily support vehicle weight, resist hot tire pickup, and absorb impacts from dropped tools. However, they can be damaged by jack stands and harsh chemicals.
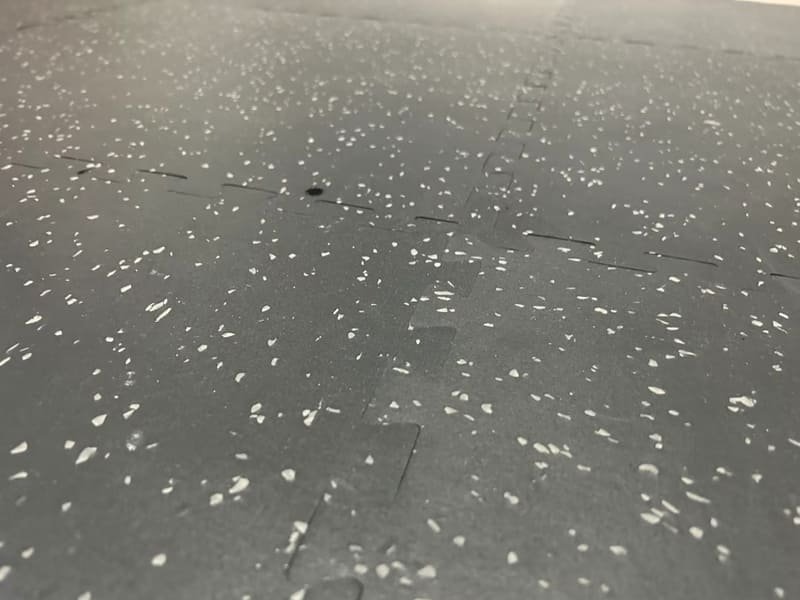
In our factory, we test materials against the exact conditions they will face. A garage is a tough environment, with unique challenges that go beyond a typical room. The rubber we use for these rolls is a non-porous, high-density SBR (Styrene-Butadiene Rubber), often from recycled tires, which is vulcanized under immense heat and pressure. This process creates a material that is resilient against compression, abrasion, and temperature changes. It’s not a coating like epoxy; it’s a solid protective barrier.
Durability Under Pressure
A car or SUV weighs thousands of pounds, but that weight is distributed across four tires. Our standard 8mm rolls handle this static load without any issue. The real danger comes from concentrated pressure. A floor jack is fine, but jack stands focus all that weight onto a tiny point, which can and will leave a permanent indent. From my experience, the best practice is simple: always place a piece of plywood or a small steel plate under each jack stand to spread the load.
Heat and Chemical Resistance
The "hot tire pickup" you see with floor paints doesn’t happen with solid rubber rolls. The material’s heat resistance prevents it from softening or lifting. When it comes to chemicals, rubber is naturally resistant to oil, grease, and antifreeze. If you wipe up spills quickly, they won’t stain. The main weakness is gasoline and aggressive solvents. If left to pool, these can cause the rubber to swell and degrade over time. Immediate cleanup is key.
Understanding these limits ensures your floor will last for decades.
What Is the True Cost of Rubber Garage Flooring Rolls?
The material itself typically costs between $2.50 to $9.00 per square foot. However, the true cost includes significant freight shipping fees, which can add several hundred dollars, plus the cost of adhesive or tape. Always get a fully shipped quote before you buy.
I see the numbers every day, and the biggest surprise for customers is never the price per square foot—it’s the shipping cost. Rubber is one of the heaviest flooring materials you can buy. A single roll for a car bay can weigh over 300 pounds. It cannot be sent by a standard courier; it has to be shipped via freight truck on a pallet. This is a major expense that must be factored into your budget from the very beginning.
Breaking Down the Costs
- Material Cost: The price varies based on thickness. An 8mm roll is a great all-around choice and falls in the middle of the price range. Thicker 10mm or 12mm rolls used for gyms will be at the higher end.
- Freight Shipping: This is the big one. Depending on your location and the total weight, expect to pay anywhere from $200 to $600 or more just for delivery. This is why buying online without getting a final shipped quote is a huge mistake.
- Installation Supplies: You will need tools and supplies. A gallon of flooring adhesive might cost $50-$100. High-quality double-sided flooring tape can be a similar expense. You also need a good utility knife and a steady supply of fresh, sharp blades.
Always calculate your total project cost, not just the material cost, to avoid any surprises.

Planning your budget accurately is crucial for a successful installation.
Is Installing Rubber Rolls a DIY-Friendly Project?
Installation is challenging but manageable for a skilled DIYer with a strong helper. It is not a one-person job. Success depends entirely on meticulous floor preparation, precise cutting, and patience during the acclimation period. It requires more strength and care than installing tiles.
On the production floor, we roll these mats with powerful machinery. Trying to unroll and position one by yourself in a garage is nearly impossible. This is the most critical piece of advice I can give: you need a second person. Beyond the brute force required, the process is one of precision. The goal is a professional, seamless look, and that doesn’t happen by accident.
Key Installation Steps
- Sub-Floor Prep: Your rubber roll will act like a blanket, conforming to every lump and crack in the concrete below. Your floor must be perfectly clean, dry, and smooth. Sweep, vacuum, and degrease any oil spots first.
- Acclimation: This step is non-negotiable. You must unroll the flooring in the garage and let it rest for at least 24 hours. This allows the rubber to relax and adjust to the garage’s temperature and humidity, preventing it from shrinking or buckling after you cut it.
- Cutting: Measure everything twice. Use a long steel straightedge as a guide and a brand-new, sharp utility blade. Don’t try to cut through the rubber in one pass. Score it lightly 3-4 times along your straightedge to create a deep groove, then bend the rubber to snap it along the line for a clean cut.
- Securing: For most residential garages, high-quality double-sided flooring tape around the perimeter and under any seams is sufficient. For a permanent bond, you can use a trowel-on flooring adhesive, but this is much less forgiving if you make a mistake.
With the right preparation and help, you can achieve a professional result.
Conclusion
Rubber rolls offer a durable, seamless floor ideal for simple garage layouts. The key is to prepare for the heavy lifting and precise cutting required for a professional finish.
Ready to transform your garage with a seamless, durable floor? Contact our flooring experts today to discuss your project, get a free, fully-shipped quote, or request product samples to see the quality for yourself.