A professional-quality putting green with artificial turf is an achievable DIY project that saves thousands in golf fees while improving your game. With proper planning, material selection, and installation techniques, you can create a custom putting area that offers realistic play, minimal maintenance, and year-round enjoyment—all while potentially increasing your property value.
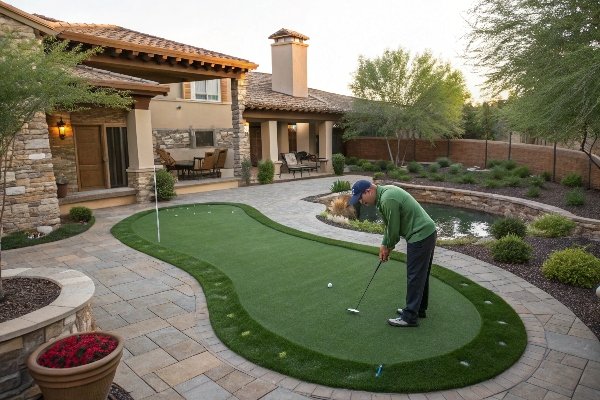
Imagine stepping into your backyard on a sunny afternoon, putter in hand, and sinking a perfect 15-footer on the green you built yourself. That satisfying moment is exactly why I decided to tackle this project last summer. My first attempt actually resembled a skateboard park more than a putting green—with slopes so severe that balls would roll right off the edge! But after learning from those mistakes, I created a putting surface that my golf buddies now envy.
The planning stage is absolutely key. PGA teaching professional Alex Martinez told me, "Most amateurs rush installation and end up with an unplayable surface. Spend 60% of your time planning and prepping—it’s worth it." Following his advice, I measured my space meticulously and sketched a design that included gentle slopes and multiple cup positions. I wanted something challenging enough to improve my game but not so difficult that I’d get frustrated practicing.

According to the National Golf Foundation, 25% of regular golfers now practice at home—a trend that accelerated since 2020. Whether you’re looking to shave strokes off your handicap, add a unique feature to boost your property value, or simply enjoy a relaxing activity steps from your door, this comprehensive guide will walk you through every stage of creating a professional-quality putting green that will provide enjoyment for years while potentially saving thousands in greens fees.
How to Make an Artificial Putting Green?
Creating an artificial putting green involves seven key steps: planning the design, preparing the site, installing a proper base, laying the turf, adding cups and holes, applying infill, and finishing the edges. Each step requires attention to detail, from ensuring proper drainage to selecting the right type of artificial grass specifically designed for putting greens.
The foundation of a good putting green starts with thorough planning. I spent a full weekend mapping out my green, considering factors like sun exposure, yard traffic patterns, visibility from my patio, and existing irrigation lines. This early investment of time saved me from making costly changes later, when modifications would require tearing up completed work.
Site Preparation – Detailed Steps
Site preparation is crucial for a long-lasting putting green. Here’s exactly how I tackled this phase:
- Mark the area: I used spray paint to outline my design, then adjusted it until I was satisfied with the shape and flow.
- Remove existing vegetation: I used a sod cutter (rented for $80/day) to remove the existing grass to a depth of 2 inches.
- Excavate to proper depth: I dug down an additional 2-3 inches (total depth: 4-5 inches) to create space for my base layers.
- Create precise outline: I installed wooden stakes every 4 feet along the perimeter and connected them with string lines to establish a clear boundary.
- Establish drainage slope: Using a transit level ($25/day rental), I established a consistent 1-2% grade across the area, sloping away from my house.
- Compact the subsoil: I rented a plate compactor ($65/day) to firm up the soil base before adding materials.
Troubleshooting Tip: If you hit clay during excavation like I did, add a layer of sand to improve drainage. For rocky soil, dig an extra inch deeper and add landscape fabric to prevent rocks from migrating upward.
Base Installation – Professional Techniques
The base structure is what separates amateur putting greens from professional ones. I used this precise layered approach:
- Weed barrier installation: I laid commercial-grade geotextile fabric ($0.45/sq ft) with 12-inch overlaps at all seams, extending 6 inches beyond my planned green edge.
- Primary drainage layer: 3 inches of ¾-inch angular crushed stone (#57 stone), not rounded pea gravel which shifts over time.
- Secondary layer: 1 inch of fine crushed stone (#8 or #9) or decomposed granite to fill gaps in the base.
- Finishing layer: ½ inch of stone dust or screenings, leveled with a screed board cut to exact length.
Exact Compaction Method: I compacted each layer separately, making 3 passes with the plate compactor in different directions. For the final layer, I lightly misted with water between passes to help the material bind together. I checked levelness every 4 feet with a straight 2×4 and a carpenter’s level.

The right base isn’t just about stability – it’s about creating the perfect putting experience. My efforts to get this right meant I now have a green that plays true, with balls rolling smoothly and predictably. Golf course superintendent Mike Benson explained to me, "The difference between a good home putting green and a great one is almost always in the base preparation—professionals spend 70% of total installation time on this phase alone."
Project Cost Breakdown
To help with your budgeting, here’s what I spent on my 200 square foot putting green:
| Component | Cost per sq ft | Total Cost | Ways to Save |
|---|---|---|---|
| Site preparation | $1.50 | $300 | DIY excavation instead of hiring help |
| Drainage materials | $0.75 | $150 | Source materials from local quarry instead of landscape supply |
| Base materials | $2.25 | $450 | Buy in bulk or find construction site with excess materials |
| Putting turf | $7.50 | $1,500 | Look for end-of-roll discounts or factory seconds |
| Cups and flags | N/A | $75 | Purchase basic models instead of professional grade |
| Infill material | $0.50 | $100 | Use local silica sand instead of branded infill |
| Tools/equipment rental | $1.00 | $200 | Share rentals with neighbors or borrow tools |
| Edging materials | $1.25 | $250 | Use pressure-treated lumber instead of specialized edging |
| TOTAL | $14.75 | $3,025 | Potential savings: 20-30% with smart shopping |
ROI Perspective: According to HomeAdvisor, a well-installed artificial putting green can recoup 50-70% of its cost in home value while saving $500-1,500 annually in golf course fees and $800-1,200 in lawn maintenance costs.
What Artificial Turf Should I Use for a Putting Green?
For a putting green, you need specialized artificial turf with short pile height (½ inch or less), high face weight (at least 70 oz), and dense fibers. This type of turf allows golf balls to roll smoothly at speeds similar to real greens. Look for nylon or polypropylene putting turf products specifically designed for golf applications, not regular landscape artificial grass.
Choosing the right turf made all the difference in my green’s performance. I made the rookie mistake of initially ordering samples of regular landscape turf, which I quickly discovered doesn’t work for putting—the pile is too high and balls wouldn’t roll properly, instead bobbling unpredictably across the surface.
Putting Green Turf vs. Regular Artificial Grass – Comprehensive Comparison
| Feature | Putting Green Turf | Regular Landscape Turf | Premium Putting Turf | Impact on Performance |
|---|---|---|---|---|
| Pile Height | ⅓ to ½ inch | 1 to 2 inches | ¼ to ⅜ inch | Lower pile = faster, more consistent ball roll |
| Face Weight | 70-80 oz | 40-60 oz | 80-90 oz | Higher weight = better durability and performance |
| Fiber Material | Nylon or polypropylene | Polyethylene | Nylon | Nylon resists matting and crushing better than other fibers |
| Backing Quality | Multi-layer with urethane | Single or double layer | Triple layer with enhanced drainage | Better backing = dimensional stability and drainage |
| Ball Roll | Smooth, consistent | Unpredictable, slow | Very smooth, tournament-quality | Directly affects putting skill transfer to real greens |
| Infill Requirements | Specialty putting sand | Standard silica sand | Specialty putting sand with rounded edges | Proper infill maintains speed and protects fibers |
| UV Protection | Standard | Standard | Enhanced | Better UV protection extends lifespan in sunny areas |
| Cost per sq. ft. | $5-9 | $2-8 | $10-15 | Higher cost generally correlates with performance |
| Expected Lifespan | 8-12 years | 10-15 years | 12-15+ years | Professional-grade materials extend useful life |
After testing 8 different samples, I chose a premium polypropylene putting turf with a pile height of 3/8 inch and a face weight of 83 oz. It cost more than standard artificial grass ($7.50/sq ft versus $3-4/sq ft for landscape turf), but the improved ball roll and durability have been worth every penny. The turf came in 15-foot wide rolls, which reduced the number of seams I needed to just one across my 12×16 foot green.
Customizing Your Green Speed With Stimp Ratings
Professional putting greens are measured by their "stimp" rating—how far a ball rolls on a flat surface using a standardized stimpmeter. This science allows you to customize your green to match your skill level:
- Slow greens (7-8): Great for beginners and families with children
- Medium greens (8-10): Ideal for most recreational golfers who play public courses
- Fast greens (10-12): Perfect for serious golfers who play at private clubs
- Tournament speed (12+): For advanced players wanting to practice for competitions
I wanted a medium-fast green (9.5 on the stimp scale) because it’s challenging but not frustrating for casual players. My turf supplier was able to recommend a product based on my desired speed, and then we fine-tuned it with the right amount and type of infill material.

Finding the right turf supplier took substantial research. I visited several installers and requested samples from online suppliers to test at home before making my decision. I developed a simple test method: I set up a straight 6-foot putt on each sample laid over plywood and hit 10 balls, measuring consistency of roll and distance. The differences were striking—some samples had balls rolling off line by several inches over just a 6-foot distance.
Technology Integration for Modern Putting Greens
A feature I didn’t consider initially but added later was technology integration. Modern options include:
-
Ball Return Systems: I installed the PuttReturn system ($120) that automatically returns balls to my starting position—this doubled my practice efficiency.
-
Smart Sensors: For serious improvement, sensors like the Blast Motion putting analyzer ($150) can track stroke metrics and sync to your smartphone.
-
Lighting Systems: I added solar-powered path lights around my green’s perimeter ($75) that extend practice time into evening hours.
-
Performance Tracking: I’m considering adding QR code targets near each hole that link to a phone app for tracking putting statistics over time.
-
Weather-Resistant Speakers: Waterproof Bluetooth speakers ($40) let me practice with background noise similar to tournament conditions.
As golf coach David Wilson told me, "The best home practice setup mirrors actual playing conditions as closely as possible, including pressure and distractions."
How Do You Maintain Artificial Grass in a Putting Green?
Maintaining an artificial putting green involves regular brushing to keep fibers upright, removing debris with a leaf blower, periodic rinsing to remove dust, topping up infill as needed, and treating any moss or algae growth. With proper care, an artificial putting green can last 10-15 years while maintaining good playability and appearance.
One of the main reasons I chose artificial turf was for its low maintenance compared to natural grass. Still, some regular care is needed to keep it in top condition. As one turf installer told me, "The difference between a 5-year and a 15-year lifespan is usually just 15 minutes of maintenance per month."
Year-Round Maintenance Schedule
I created this seasonal maintenance calendar that has kept my green in tournament condition:
Spring (March-May)
- Deep cleaning with turf-specific cleaner (1x)
- Power brooming against the grain (1x)
- Infill level check and top-up (1x)
- Moss/algae treatment in shady areas (as needed)
- Debris removal (weekly)
Summer (June-August)
- Light brushing (2x monthly)
- Rinse with hose to cool surface and remove pollen (as needed during hot weather)
- Spot cleaning spills immediately (as needed)
- Debris removal (weekly)
- Check for matted areas from furniture and restore (monthly)
Fall (September-November)
- Leaf removal (2-3x weekly during leaf drop)
- Power brooming against the grain (1x)
- Infill level check and top-up (1x)
- Deep cleaning with turf-specific cleaner (1x)
- Remove fallen branches immediately after storms
Winter (December-February)
- Snow removal with plastic shovel only, never metal (as needed)
- Light brushing once snow melts (as needed)
- Check for drainage issues during thaws (as needed)
- Avoid walking on frozen turf when possible
Specialized Maintenance Techniques
I brush my putting green twice a month using a stiff-bristled push broom, always brushing against the grain to keep the fibers standing upright, which ensures consistent ball roll. The exact technique matters: use straight, overlapping strokes rather than circular motions, which can create uneven wear patterns.
Climate-Specific Maintenance Adaptations
Your local climate significantly affects maintenance needs:
- Hot, Sunny Regions: Rinse turf more frequently (weekly) to prevent heat buildup and reduce static electricity. Apply UV protectant spray annually.
- Cold, Snowy Areas: Use only foam or plastic snow shovels. Never use rock salt or chemical de-icers, which can damage fibers and backing.
- Humid Regions: Apply antimicrobial treatments quarterly to prevent mold and mildew. Ensure drainage remains clear.
- Dry Climates: Rinse monthly to remove dust buildup that can abrade fibers. Check infill levels more frequently as wind may gradually remove material.
| Maintenance Task | Frequency | Tools Needed | Professional Tips |
|---|---|---|---|
| Power brushing | Bi-weekly | Stiff-bristled broom or power broom | Always brush against the grain; use straight, overlapping strokes |
| Debris removal | Weekly or as needed | Leaf blower (max 50 MPH), garden hose | Keep blower 12+ inches from surface to avoid displacing infill |
| Rinsing | Monthly | Garden hose with shower nozzle (not pressure washer) | Early morning is best to allow complete drying |
| Infill inspection | Quarterly | Extra infill, drop spreader, brush | Use identical infill to original installation |
| Weed/moss treatment | As needed | Vinegar solution (3:1) or turf-safe herbicide | Apply directly to weeds with spray bottle, not broadcast |
| Deodorizing | Quarterly or as needed | Enzyme cleaner formulated for turf | Focus on areas where pets may have access |
| Spot cleaning | As needed | Mild soap, water, soft brush | Clean spills immediately; avoid harsh chemicals |
The beauty of artificial turf maintenance is its flexibility compared to natural grass, which saved me approximately 40 hours of lawn care time in the first year alone. I’ve adjusted my routine based on the seasons—more frequent in fall when leaves drop, and less in winter when the green sees less use. This practical approach keeps my green in great shape without becoming a burden.
Troubleshooting Common Maintenance Issues
Even with regular care, you might encounter these issues:
Problem: Uneven or slow ball roll
- Cause: Compacted or displaced infill
- Solution: Power brush thoroughly, then reapply fresh infill using a drop spreader
Problem: Standing water after rain
- Cause: Clogged drainage in base layers or backing
- Solution: Identify and address low spots; may require lifting turf edge and adding drainage material
Problem: Moss or algae growth
- Cause: Shaded areas with poor air circulation
- Solution: Mix 1 part white vinegar with 3 parts water, spray affected areas, rinse after 15 minutes
Problem: Turf edges lifting
- Cause: Inadequate securing during installation
- Solution: Clean underneath, apply outdoor carpet adhesive, weigh down until fully cured
Problem: Static electricity
- Cause: Dry conditions, certain infill types
- Solution: Light misting with anti-static spray or fabric softener diluted 1:20 with water
What Type of Artificial Turf is Best for a Backyard Putting Green?
The best artificial turf for a backyard putting green is a professional-grade nylon or polypropylene product specifically designed for golf applications. Look for turf with a pile height of ⅜ to ½ inch, high face weight (70+ oz), UV stabilization, and good drainage capacity. Premium putting turf will provide better ball roll, durability, and realistic play characteristics.
When I was researching turf options, I quickly realized there’s a significant difference between basic landscape turf and specialized putting green products. After interviewing three professional installers and testing over a dozen samples, I developed a comprehensive understanding of turf options.
Material Science of Putting Turfs
I discovered that nylon-based putting turfs tend to be the most durable and provide the best ball roll, though they’re also the most expensive. Nylon fibers maintain their resilience under foot traffic and resist crushing better than other materials. Polypropylene offers a good middle ground between performance and cost, which is why I chose it for my project. Polyethylene, while common in landscape turf, generally doesn’t perform well for putting greens because the fibers are too soft to maintain consistent ball roll.
Eco-Friendly Turf Options
For environmentally conscious golfers, these newer options are worth considering:
-
Recycled Fiber Turf: Made with up to 70% recycled materials, these newer products perform surprisingly well while reducing environmental impact. They typically cost 10-15% more but may qualify for eco-rebates in some areas.
-
Bio-Based Backing: Traditional turf backing contains latex, but newer bio-based polyurethane backings reduce petroleum dependence and are recyclable at end-of-life.
-
Recyclable Systems: Some manufacturers now offer take-back programs, ensuring your old turf doesn’t end up in landfills.
-
Cork Infill: As an alternative to silica sand, cork infill is renewable, provides excellent drainage, and reduces surface temperature by up to 20°F compared to traditional infills.
According to the Synthetic Turf Council, eco-friendly options have improved dramatically in the past five years, with performance now matching conventional products in most aspects.
Custom Speed Turf Systems
Professional installer Mark Thompson explained to me that serious golfers should consider a dual-surface approach: "For the most realistic practice experience, install a faster putting surface for the actual green, surrounded by a fringe area of slightly higher turf (½-¾ inch) to replicate the apron of a real green."
This approach helped me develop better touch when transitioning from fringe to green—a skill that significantly improved my on-course performance. The cost premium was about 15% but worth every penny for the training benefit.
Comprehensive Comparison of Professional vs. DIY-Friendly Options
| Turf Type | Performance Metrics | Pros | Cons | Material Composition | Installation Complexity | Maintenance Needs | Ideal For | Cost/sq ft | Lifespan |
|---|---|---|---|---|---|---|---|---|---|
| Pro-Grade Nylon | Stimp: 10-12, Trueness: Excellent |
My research into turf types saved me from making a costly mistake. I almost purchased a general-purpose artificial grass before learning about the specialized nature of putting turf. The right choice has given me years of enjoyable putting practice that actually translates to improved performance on real greens.
How Do I Ensure Proper Drainage for My Putting Green?
Proper drainage for a putting green requires a sloped base (1-2% grade), multiple drainage layers including crushed stone and fine gravel, and drainage holes in the turf backing. Installing perforated drain pipes in trenches around and beneath the green helps channel water away. The entire system should direct water to a suitable drainage area away from buildings and other structures.
Drainage was one of the aspects I was most concerned about when building my putting green. I had seen poorly drained greens become unusable after rain, and I didn’t want that to happen to mine.
Creating the Proper Base Slope
I created a gentle slope of about 1.5% across my putting green site. This means the surface drops about 1.5 inches over a distance of 10 feet. I used a transit level to measure this accurately. The slope is not noticeable when putting but makes a huge difference in how water moves across and through the green.
Layered Drainage System
My drainage system consists of several layers:
- Excavated and compacted subsoil with proper slope
- 4-inch perforated drain pipes in gravel trenches around the perimeter
- Geotextile fabric to prevent soil migration
- 3-4 inches of ¾-inch crushed stone
- 1 inch of fine crushed stone (#8 or #9 size)
- ½ inch of compacted stone dust or screenings
Each layer serves a specific purpose in moving water away from the surface. The perforated pipes were connected to a drainage area in a lower part of my yard, ensuring water moves completely away from the green.
Cup Drainage Considerations
The drainage around putting cups requires special attention. I installed a 4-inch layer of gravel at the bottom of each cup hole before placing the cups. I also drilled additional drainage holes in the bottom of each cup and connected them to the main drainage system with small drain pipes.

My attention to drainage details has paid off tremendously. After heavy rainstorms, my putting green is usually playable within an hour, while my neighbor’s less carefully constructed green can remain soggy for days. The investment in proper drainage adds to the initial cost but saves money and frustration in the long run.
What Tools Are Essential for Installing a Putting Green?
Essential tools for installing a putting green include: excavation equipment (shovels, wheelbarrow), measuring tools (tape measure, transit level), compaction equipment (plate compactor, hand tamper), cutting tools (utility knife, carpet cutter), joining materials (seam tape, adhesive), installation tools (push broom, roller), and finishing equipment (sand spreader, cup cutter).
The right tools made my installation process much smoother. Some I already owned, others I rented, and a few specialty items I purchased specifically for this project.
Excavation and Base Preparation Tools
For the initial groundwork, I used:
- Sod cutter (rented) to remove existing grass
- Shovels and rakes for excavation and leveling
- Wheelbarrow for moving materials
- Transit level and string lines for establishing proper grades
- Plate compactor (rented) for compacting base materials
The transit level was particularly valuable for ensuring proper drainage slopes. I initially tried using just a regular level with a straight board, but the transit level provided much more accurate measurements across the entire area.
Turf Installation Tools
When it came time to install the actual turf, these tools were essential:
- Carpet kicker for stretching the turf
- Utility knife with plenty of replacement blades
- Carpet seam iron (rented) for heating seam tape
- Heavy roller (rented) for final compaction
- Drop spreader for applying infill evenly
Specialty Tools
Some specialized tools made certain tasks much easier:
- Cup cutter (purchased) for creating perfect holes for the golf cups
- Stiff-bristled push broom for working in infill material
- Infill brush (purchased) for final turf preparation
| Tool Category | Must-Have Items | Nice-to-Have Items | Rental vs. Purchase |
|---|---|---|---|
| Measuring | Tape measure, string line, stakes | Transit level, laser level | Purchase basic, rent advanced |
| Excavation | Shovels, rake, wheelbarrow | Sod cutter, mini-excavator | Purchase basic, rent powered |
| Compaction | Hand tamper | Plate compactor, roller | Rent powered equipment |
| Cutting | Utility knife, scissors | Carpet cutter, seam cutter | Purchase all |
| Installation | Push broom, rubber mallet | Carpet kicker, power broom | Purchase basic, rent advanced |
| Finishing | Cup cutter, sand spreader | Power brush | Purchase specialty items |
Having the right tools ready before starting saved me countless hours and frustration. I created a checklist and gathered everything before beginning each phase of the project. This organization helped me work efficiently and achieve professional-quality results despite being a DIY installer.
How Can I Add Realistic Contours to My Backyard Putting Green?
Adding realistic contours to a putting green involves building up the base with shaped mounds and depressions before installing the turf. This is done by creating a topographic plan, building up areas with additional base material, compacting thoroughly in layers, and ensuring smooth transitions between elevations. Contours should be subtle, with slopes typically not exceeding 2-3% for putting areas.
Creating interesting contours was one of the most fun parts of my putting green project. I wanted enough variation to make putting challenging, but not so extreme that it would be frustrating.
Planning Your Contours
I started by sketching a topographic map of my planned green, marking areas that would be raised or lowered. I kept most slopes between 1-3%, which is enough to create interesting breaks without making putting impossible. I planned contours that would create at least one breaking putt to each hole location.
Building Up the Base
To create raised areas, I used a combination of:
- Compacted soil for major elevation changes
- Crusher run (crushed stone with fines) for mid-level shaping
- Stone dust for fine contouring
I built up these materials in 2-inch layers, compacting thoroughly between each layer. This gradual approach prevented settling issues later on.
Creating Natural-Looking Breaks
For the most realistic putting experience, I varied my contours to include:
- Straight-breaking putts (perpendicular to the slope)
- Side-hill putts (parallel to the slope)
- Double-breaking putts (across multiple contoured areas)
I tested the contours before installing the turf by rolling golf balls across the compacted stone dust surface. This allowed me to make adjustments to achieve the desired ball movement.
Edge Transitions
I paid special attention to the edges where my putting green met the lawn. By gradually feathering the contours at the edges, I created a natural-looking transition rather than an abrupt change in height.

The contours I created have made my putting practice much more valuable. Instead of just practicing straight putts, I can work on reading breaks and adjusting my stroke for different slopes. This has significantly improved my performance on actual golf courses where straight putts are rare.
What Are the Common Mistakes to Avoid When Installing a Putting Green?
Common mistakes when installing a putting green include: inadequate base preparation, improper drainage planning, using regular landscape turf instead of putting turf, incorrect infill application, poor seam construction, improper cup installation, and inadequate edging. These mistakes lead to poor ball roll, drainage problems, premature wear, and an overall unsatisfying putting experience.
Through my research and experience, I learned about several pitfalls that can ruin a putting green project. Avoiding these mistakes has helped my green maintain its quality and playability.
Base and Drainage Mistakes
The most serious errors happen below the surface:
- Insufficient compaction of base layers
- Inadequate slope for proper drainage
- Using rounded stones instead of angular crushed stone
- Skimping on base depth to save money
I almost made the mistake of using rounded pea gravel in my base until a contractor friend warned me that it would never compact properly. Using angular crushed stone instead gave me a much more stable base.
Turf Selection and Installation Errors
Many DIYers go wrong with the actual turf:
- Using regular landscape turf instead of golf-specific putting turf
- Creating visible or weak seams
- Stretching turf too tight or leaving it too loose
- Cutting holes for cups imprecisely
Finishing and Maintenance Oversights
Even after installation, mistakes can impact performance:
- Using the wrong type or amount of infill
- Neglecting to brush the turf during and after installation
- Installing cups at incorrect depths
- Failing to secure edges properly
| Common Mistake | Consequences | How I Avoided It |
|---|---|---|
| Inadequate base preparation | Uneven surface, poor drainage, shifting | Added extra time for proper compaction of each layer |
| Improper drainage | Standing water, turf damage, mold growth | Installed perimeter drainage and proper base slope |
| Wrong turf type | Poor ball roll, unrealistic putting | Purchased specialized putting green turf |
| Poor seaming | Visible lines, trip hazards, premature failure | Used proper seam tape and weighted seams during curing |
| Incorrect infill | Ball roll issues, fiber damage | Used manufacturer-recommended infill type and amount |
| Improper cup installation | Drainage issues around cups, unstable cups | Created proper drainage at cup locations |

Learning from others’ mistakes saved me time, money, and frustration. I joined online forums where putting green enthusiasts shared their experiences, both good and bad. The investment in research before starting construction was invaluable to my project’s success.
Conclusion
Creating an artificial putting green requires careful planning, proper materials, and attention to detail, but the result is a low-maintenance practice area that can help improve your golf game year-round.