Hochwertige Materialien allein sind noch keine Garantie für einen erfolgreichen Sportboden. Die meisten Misserfolge sind auf eine schlechte Vorbereitung des Unterbodens, eine unsachgemäße Akklimatisierung und einen falschen Klebstoffauftrag zurückzuführen. Selbst der beste EPDM-Gummi oder hochverdichtete Rasen wird Blasen werfen, Lücken bilden oder abblättern, wenn die Verlegeumgebung und die technischen Standards nicht beachtet werden.
Ich habe erlebt, wie viele Anlagenbesitzer viel Geld in erstklassige Gummifliesen investiert haben, die dann innerhalb weniger Monate versagt haben. Die harte Wahrheit ist, dass "gutes Material" nur etwa 30% des Erfolgs eines Projekts ausmacht. Die restlichen 70% hängen von der Technik und dem Verlegeprozess ab. Wenn wir über Sporthallenböden sprechen, geht es um ein technisches System, bei dem sich das Material perfekt mit dem Gebäude verbinden muss. Wenn man die Wissenschaft der Feuchtigkeit, der Nivellierung oder der chemischen Kompatibilität außer Acht lässt, werden die physikalischen Eigenschaften des Gummis irrelevant. Ich sehe oft "Stolperlippen" oder Lücken, weil der Verleger den Kautschuk wie einen statischen Teppich behandelt hat und nicht wie ein dynamisches Material, das auf seine Umgebung reagiert. Kritisches Denken zur Analyse einsetzen warum Bodenbelagsprojekte in Sporthallen scheitern ist in der Regel auf einen übersprungenen Schritt in der anfänglichen Planungsphase zurückzuführen und nicht auf einen Fehler im Gummi selbst.

Nur wenn Sie diese versteckten Risiken verstehen, können Sie Ihre Investition schützen. Schauen wir uns die spezifischen technischen Phasen an, in denen die meisten Fehler passieren, beginnend mit dem Fundament unter Ihren Füßen.
Ist die Vorbereitung des Unterbodens der unsichtbare Schuldige für das Versagen von Bodenbelägen?
Ja, Probleme mit dem Unterboden sind die Hauptursache für Katastrophen bei Sporthallenböden. Feuchtigkeit, Unebenheiten und Verunreinigungen verhindern, dass sich Klebstoffe verbinden, und führen dazu, dass der Kautschuk Unebenheiten abzeichnet. Ein Unterboden muss trocken, eben und sauber sein, um die strukturelle Integrität und Sicherheit des endgültigen Sportbodens zu gewährleisten.
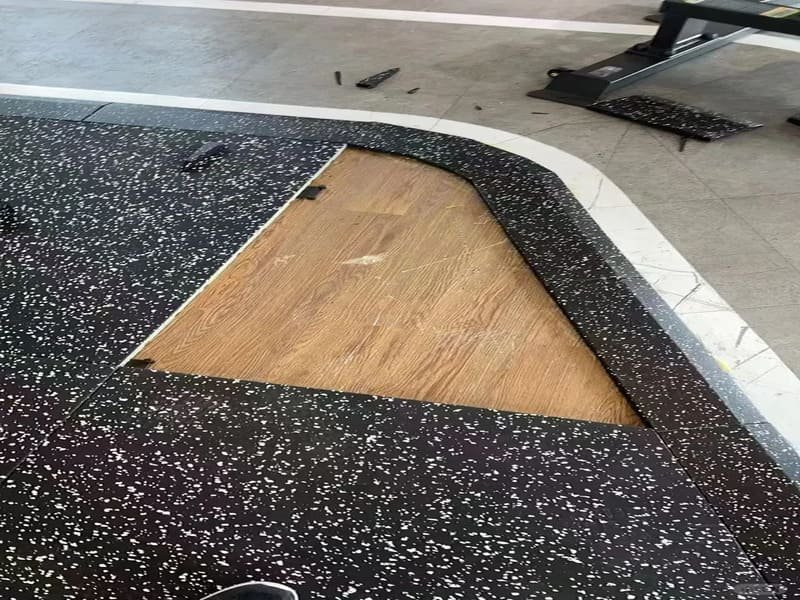
Feuchtigkeit ist in unserer Branche der Killer Nummer eins. Der hydrostatische Druck einer Betonplatte kann Wasserdampf nach oben treiben, wodurch der Klebstoff emulgiert und die Gummirollen Blasen werfen. Ich bestehe immer auf einem Kalziumchlorid-Test oder einer Sonde für die relative Luftfeuchtigkeit (RH), bevor wir eine Gummirolle überhaupt öffnen. Außerdem ist die Ebenheit entscheidend. Eine Abweichung von 3 mm über einen Radius von 3 Metern mag gering erscheinen, aber in einem Falzziegelsystem führt dies zu Stolperlippen", die sowohl hässlich als auch gefährlich sind. Auch Oberflächenverunreinigungen wie alte Farbe oder Öl beeinträchtigen die Verbindung. Wenn der Kleber am Staub und nicht an der Platte haftet, verschiebt sich der Boden, sobald ein Schlitten darauf fährt. In mehrstöckigen Einrichtungen ist die Integration eines akustische Unterlage Während dieser Phase ist es wichtig, Lärm und Vibrationen zu kontrollieren, bevor die Deckschicht eingebaut wird.
Anforderungen an den Unterboden Standards
| Faktor | Anforderung | Auswirkungen des Scheiterns |
|---|---|---|
| Feuchtigkeitsgehalt | < 3 lbs pro 1.000 sq.ft oder < 75% RH | Klebstoffversagen, Schimmelbildung und Blasenbildung. |
| Ebenheit/Nivellierung | 1/8" (3mm) über 10 Fuß | Lücken zwischen den Fliesen und erhöhte Stolpergefahr. |
| pH-Wert der Oberfläche | Zwischen 7 und 9 | Ein hoher Alkaligehalt zerfrisst die Gummibindemittel. |
| Sauberkeit | Staubfrei und ölfrei | Schlechte mechanische Verbindung, die zu Bodenverschiebungen führt. |
Selbst ein perfekter Unterboden kann ein Projekt nicht retten, wenn man das Material übereilt in den Raum bringt. Damit kommen wir zum entscheidenden Schritt der Umgebungskontrolle.
Warum wird die Materialakklimatisierung von den Verlegern oft ignoriert?
Gummi ist ein dynamisches Material, das sich je nach Temperatur ausdehnt und zusammenzieht. Die Verlegung von kaltem Gummi in einer warmen Turnhalle ohne eine 48-stündige Akklimatisierungszeit führt zu massiven Lücken oder Beulen. Das HVAC-System muss aktiv sein, um die Abmessungen des Materials zu stabilisieren, bevor es auf dem Boden befestigt wird.
Ich habe beobachtet, wie Crews Gummirollen aus einem heißen Lkw entladen und sie sofort verklebt haben. Das ist ein Rezept für eine Katastrophe. Sobald der Gummi auf die Umgebungstemperatur der Turnhalle abkühlt, schrumpft er. Plötzlich werden aus den engen Nähten vom ersten Tag bis zum fünften Tag 5 mm große Lücken. Wenn Sie dagegen kaltes Gummi verlegen, das sich später ausdehnt, kommt es zu "Knicken" oder "Wellen" im Boden, die sich unmöglich glätten lassen. Als technischer Leiter schreibe ich vor, dass alle Gummiprodukte mindestens 24 bis 48 Stunden im Verlegeraum liegen müssen. So kann sich die innere Spannung der Rollen entspannen. Wir stellen auch sicher, dass die Klimakontrolle in der Halle konstant bleibt. Wenn die Klimaanlage während der Installation ausgeschaltet ist, aber später wieder eingeschaltet wird, kann der plötzliche Wechsel von Luftfeuchtigkeit und Temperatur die Klebeverbindung über ihre Grenzen hinaus belasten.
Risiken der Expansion und Kontraktion
| Material Typ | Reaktion auf Wärme | Reaktion auf Kälte | Prävention Methode |
|---|---|---|---|
| Recycelter Gummi | Ausdehnung (Knickung) | Kontraktion (Gapping) | 48-stündige Stabilisierung der HLK |
| Leistung Turf | Fasererweichung | Sprödigkeit der Fasern | Spannungsgesteuertes Walzen |
| EPDM-Deckschichten | Geringfügige Änderung der Abmessungen | Minimale Veränderung | Nähte mit Kompressionspassform |
Schlechtes Timing ruiniert die Verbindung, aber die Wahl des falschen Produkts für die spezifische Aktivität kann das Material selbst ruinieren.
Verursacht die Wahl des Rasens Leistungseinbußen?
Die Verwendung von Landschaftsrasen für Gymnastikbahnen führt zu geschmolzenen Fasern und hohem Luftwiderstand. Turnhallenrasen muss auf die jeweilige Anwendung abgestimmt sein, wobei die Florhöhe und der Reibungskoeffizient im Vordergrund stehen müssen. Die Wahl des falschen "hochwertigen" Produkts für den falschen Einsatz führt zu schnellem Verschleiß und Geräteschäden.
Viele Kunden kaufen "Premium"-Rasen in dem Glauben, dass alle Gräser gleich sind. Das ist ein Irrtum. Landschaftsrasen ist so konzipiert, dass er weich aussieht, aber unter einem 200 kg schweren Schlitten erzeugt die Reibung genug Hitze, um die Kunststofffasern buchstäblich zu schmelzen. Wir verwenden spezielle Nylon- oder Polyethylenmischungen mit einer kürzeren Florhöhe für Sporthallen. Ein weiterer wichtiger Fehlerpunkt ist die Füllung. Wenn man nicht die richtige Menge an Sand oder Gummi in einer Sprintbahn verwendet, entstehen "tote Punkte". Diese Stellen führen dazu, dass die Sportler die Bodenhaftung verlieren oder stolpern. Ich bewerte immer die spezifischen Übungen, die für die Zone geplant sind, bevor ich eine Rasendichte empfehle. Wenn Sie schwere Schlittenübungen machen, muss die Dichte hoch genug sein, um das Gewicht zu tragen, ohne dass die Unterseite des Rasens unter der seitlichen Kraft reißt.
Rasenspezifikation für Turnhallen
| Metrisch | Standard-Turnhallenrasen | Heavy-Duty-Schlittenrasen |
|---|---|---|
| Höhe des Stapels | 15mm - 20mm | 10mm - 15mm (Kurz/Dicht) |
| Fasermaterial | PE (Polyethylen) | Nylon (hohe Hitzebeständigkeit) |
| Dichte | 50.000 Stiche/qm | 65.000+ Stiche/qm |
| Gesicht Gewicht | 40 Unzen - 60 Unzen | 60 Unzen - 80 Unzen |
Die Auswahl ist der erste Schritt, aber die Art und Weise, wie man ihn aufträgt, bestimmt, wie lange er dort bleibt. Lassen Sie uns über die häufigsten Fehler beim Auftragen von Klebstoffen sprechen.
Wie können Fehler im Klebstoff die Garantie ausschließen?
Die Verwendung der falschen Spachtelgröße oder das Ignorieren der "Ablüftzeit" verursacht 90% der klebstoffbedingten Fehler. Zu viel Klebstoff führt zu "Schlieren" an den Nähten, während zu wenig Klebstoff zu hohlen Stellen führt. Wenn Sie die spezifischen Anweisungen des Herstellers für nassklebende oder druckempfindliche Klebstoffe nicht befolgen, verlieren Sie Ihre Garantie.
Der Klebstoffauftrag ist eine Wissenschaft, kein Gefühl. Ich erlebe immer wieder, dass Verleger eine abgenutzte Kelle verwenden, die nicht die richtige Einkerbungstiefe hinterlässt. Das bedeutet, dass das Gummi nicht vollständig bedeckt wird. Die "Ablüftzeit" ist ebenfalls entscheidend. Das ist die Zeit, die der Kleber auf dem Boden verweilen muss, bevor Sie den Belag verlegen. Wenn Sie den Belag zu früh verlegen, schließen Sie Feuchtigkeit und Lösungsmittel ein, was zu Blasenbildung führt. Wenn Sie ihn zu spät verlegen, ist der Kleber bereits "übergeschwappt" und kann den Belag nicht mehr halten. Außerdem müssen wir die "First 72 Hours"-Regel berücksichtigen. Viele Fitnessstudiobesitzer wollen ihre schweren Power Racks sofort auf den neuen Boden stellen. Dadurch verschiebt sich der Belag, während der Kleber noch aushärtet, und es entstehen dauerhafte Wellen. Sie müssen warten, bis die chemische Verbindung vollständig ausgehärtet ist, bevor Sie den Boden schweren Punktlasten oder rollendem Verkehr aussetzen.
Kellen- und Klebernormen
| Anmeldung | Kellenzahnung Größe | Klebstoff Typ |
|---|---|---|
| 8mm Gummiröllchen | 1/16" x 1/16" x 1/16" Quadrat | Einteiliges Urethan |
| 20mm schwere Matten | 1/8" x 1/8" x 1/8" V-Kerbe | Zweikomponenten-Polyurethan |
| Turnhalle Turf | 3/16" x 5/32" V-Kerbe | Hochbindender Rasenkleber |
Das letzte Teil des Puzzles ist das, was passiert, nachdem die Installateure das Gebäude verlassen haben.
Kann eine unsachgemäße Reinigung Ihren Turnhallenboden zerstören?
Ja, die Verwendung von Reinigern auf Erdölbasis oder stark säurehaltigen Reinigern greift die Polyurethan-Bindemittel an, die die Gummiböden zusammenhalten. Dies führt zu "Lochfraß", bei dem der Kautschuk zu bröckeln und sich abzulösen beginnt. Eine ordnungsgemäße Pflege erfordert pH-neutrale Reiniger und nicht scheuernde Werkzeuge, um die Lebensdauer des Bodens zu verlängern.
Die Wartung ist oft der Punkt, an dem die Technik eines Bodens ihr Ende findet. Ich habe gesehen, wie schöne Böden ruiniert wurden, weil ein Reinigungsteam ein für Wachsböden bestimmtes Abbeizmittel auf einer Gummioberfläche verwendet hat. Diese aggressiven Chemikalien zersetzen den Klebstoff und das Gummi selbst. Bei Rollrasen liegt das Problem oft im mangelnden Bürsten. Mit der Zeit legen sich die Fasern durch den Fußverkehr flach, wodurch sich Bakterien und Hautzellen festsetzen. Dies stellt ein Hygienerisiko dar und ruiniert das "Gedächtnis" der Fasern. Als Verlegeleiter stelle ich für jedes Projekt ein klares Pflegeprotokoll auf. Dazu gehört die Verwendung eines Mikrofasermopps und eines speziellen Neutralreinigers. Wir warnen auch davor, den Boden mit Wasser zu "fluten". Überschüssiges Wasser kann in die Nähte eindringen und den Klebstoff erreichen, so dass er von unten nach oben versagt.
Empfohlener Wartungsplan
| Frequenz | Aktion | Werkzeug |
|---|---|---|
| Täglich | Staubsauger / Staubmop | Hochfiltrierendes Vakuum |
| Wöchentlich | Feuchter Mopp | Neutraler pH-Reiniger |
| Monatlich | Tiefes Peeling | Zylindrischer Bürstenschrubber |
| Vierteljährlich | Rasenpflege | Elektrische Bürste / Harke |
Wenn Sie diese Pflegemaßnahmen nicht beachten, wird Ihr hochwertiger Fußboden schneller zur Belastung als jedes Training es könnte.
Schlussfolgerung
Ein guter Sportboden ist ein technisches System. Der Erfolg erfordert einen perfekten Untergrund, eine geduldige Akklimatisierung und eine präzise Klebearbeit.
Sie planen ein Projekt zur Verlegung von Bodenbelägen in einem Fitnessstudio und möchten sicherstellen, dass es gleich beim ersten Mal richtig gemacht wird? Schicken Sie mir eine private Nachricht für eine technische Beratung oder eine professionelle Installationsberatung!